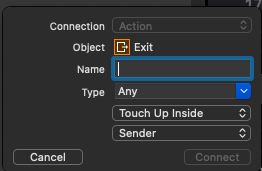
コントロールを追加して、アクションを追加しようとしたところ、Object が Exit となってしまい、変更できない。
原因
ViewController の Class が誤っている可能性がある。これを正しく設定する。

Blog of aiharasoft.com

コントロールを追加して、アクションを追加しようとしたところ、Object が Exit となってしまい、変更できない。
原因
ViewController の Class が誤っている可能性がある。これを正しく設定する。

[WindowScene] Failed to instantiate the default view controller for UIMainStoryboardFile ‘Main’ – perhaps the designated entry point is not set?
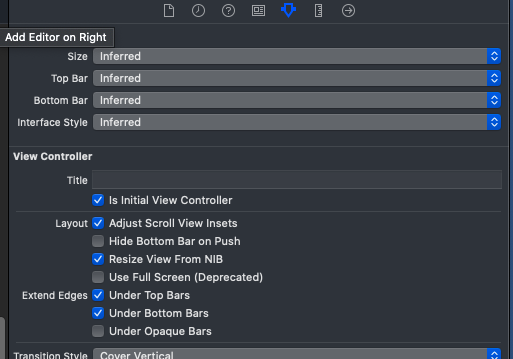
“Is Initial View Controller” がオフになっていると、上記エラーが発生する場合がある。mainstoryboard の最初に起動すべき ViewController の Attribute Inspector から、”Is Initial View Controller” の状態を確認し、オフの場合は、オンにする。
""" docustring """
import os
from PIL import Image, ImageOps, ImageEnhance, ImageFilter, ImageChops, ImageDraw

os.chdir("/users/uchukamen/desktop/python/poster/images")
files = os.listdir(".")

for imageFile in files:
    if not imageFile.endswith("jpeg"):
        continue
    print(imageFile)

    origImage = Image.open(imageFile)

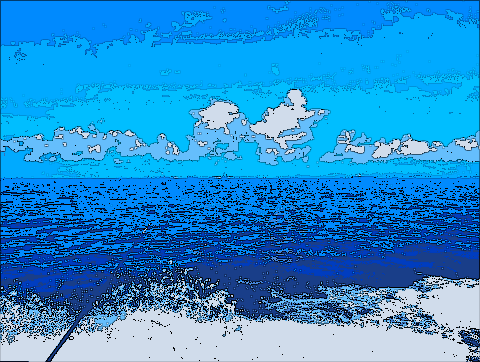
    # 1/4 縮小画像を作成
    w, h = origImage.size
    smallSize = (int(w/8), int(h/8))
    smallImage = origImage.resize(smallSize, Image.NEAREST)

    # 色強調 enhancerオブジェクト生成
    enhancer = ImageEnhance.Color(smallImage)
    # enhancerオブジェクトの強調
    enhancedSmallImage = enhancer.enhance(8)

    # 減色
    img_res = enhancedSmallImage.quantize(8)

    # 線画の作成
    maskImage = img_res.convert("L").filter(ImageFilter.CONTOUR)

    # 黒背景画像を作成
    blackImage = Image.new('RGBA', smallSize, 'black')

    # 色強調画像と線画の合成
    mergedImage = Image.composite(img_res, blackImage, maskImage)

    # 色強調 enhancerオブジェクト生成
    enhancer2 = ImageEnhance.Color(mergedImage)
    # enhancerオブジェクトの強調
    enhancedSmallImage = enhancer2.enhance(1)
    enhancedSmallImage.show()
アニメーションするLaunchScreen を作ろうとして、LaunchScreen.storyboard に、独自のクラスを適用してみたところ、”Launch screens may not set custom classnames” というエラーが発生する。このため、Launch Screenではアニメーションができない。
そこで、起動画面に ViewController によりアニメーションを表示し、アニメーションが終わったら、メインのViewController に遷移する方法を試みる。
遷移先のメインのViewController に Storyboard ID を付与する。
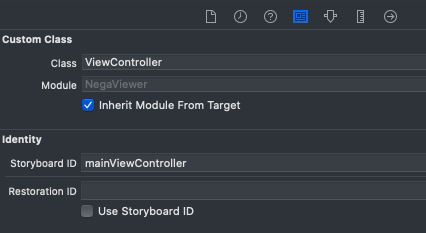
LaunchScreen の代わりとなる ViewController を追加する。

SplashViewController.swift を追加し、カスタムクラスを設定・実装する。

SplashViewController は次のとおり。
import UIKit

class SplashViewController: UIViewController {

    override func viewDidLoad() {
        super.viewDidLoad()
    }

    override func viewDidAppear(_ animated: Bool) {
        super.viewDidAppear(animated)

        let storyboard = UIStoryboard(name: "Main", bundle: nil)
        let nextViewController = storyboard.instantiateViewController(withIdentifier: "mainViewController")
        self.present(nextViewController, animated: true, completion: nil)
    }
}
instantiateViewController をviewDidLoad() から呼び出すと、次の警告が表示されて、Viewの遷移ができない。
Warning: Attempt to present <***.ViewController: 0x104910db0> on <***.SplashViewController: 0x10490a030> whose view is not in the window hierarchy!
原因については、次の記事にあるように、まだ ViewController が存在していないのに、遷移しようとしたため。
対応としては、上記のように viewDidAppear の中で遷移する。
whose view is not in the window hierarchy! 初心者向け エラー
Launch Screen – Apple Developer により
重要
起動画面に static 画像を使用しないでください。デバイスの画面サイズと向き」を参照してください。
アプリの最初の画面と同じ起動画面
アプリの起動が完了したときに外観が異なる要素を含めると、起動画面とアプリの最初の画面の間で不快なフラッシュが発生する可能性があります。また、起動画面がデバイスの現在の外観モードと一致していることを確認してください。
起動画面にテキストを含めない
起動画面のコンテンツは変更されないため、表示されるテキストはローカライズされません。
高速な起動
あまり凝ったローンチスクリーンは避けて、コンテンツにすばやくアクセスしてタスクを実行できるようにする。
宣伝しない
起動画面はブランディングの機会ではありません。スプラッシュ画面や「About」ウィンドウのようなエントリエクスペリエンスを設計しないでください。ロゴやその他のブランド要素は、アプリの最初の画面の固定部分でない限り、含めないでください。ゲームまたは他のイマーシブアプリが最初の画面に移行する前に無地を表示する場合、その無地のみを表示する起動画面を作成できます。
ということなので、高速、シンプル、Autoresizable、宣伝なしの Launch Screen を設計する必要がある。
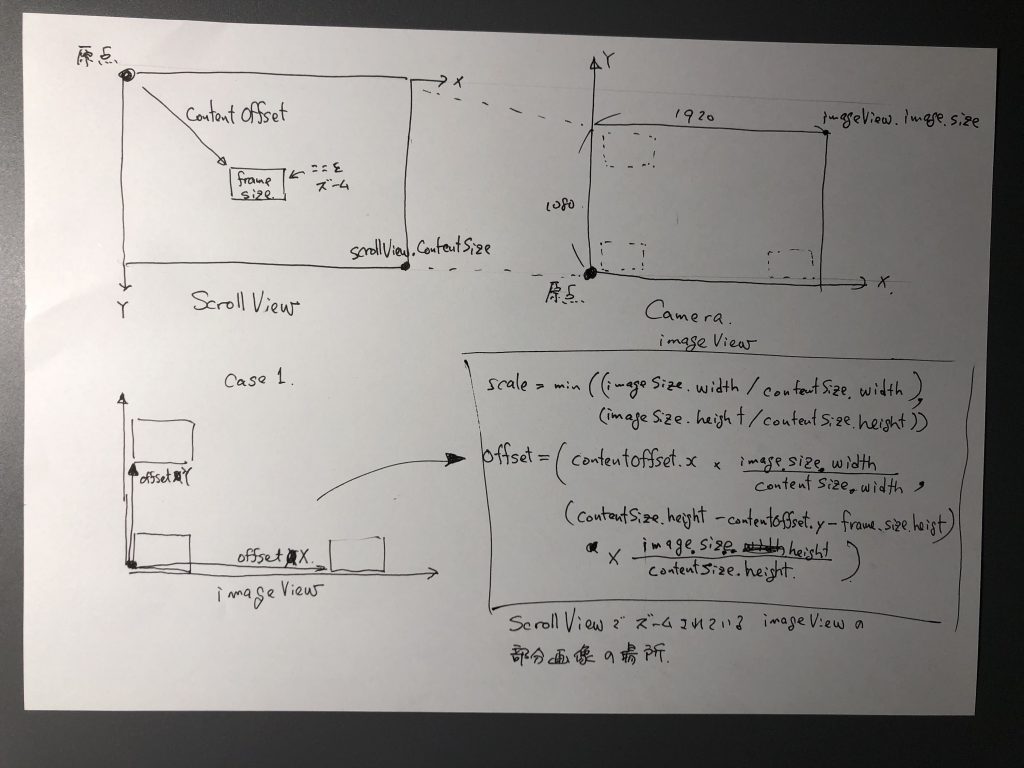
        guard let ciImage = self.imageViewOut.image?.ciImage else { return }
        guard let imageSize = self.imageViewOut.image?.size else { return }

        let frameSize = self.scrollView.frame.size
        let ciContext = CIContext(options: nil)

        let zoomScale = self.scrollView.zoomScale
        // ズームしない場合、contentSizeがセットれさず、ゼロのまま。
        // そこで、frameSizeと、zoomScaleから contentSizeを計算する。
        // let contentSize = self.scrollView.contentSize
        let contentSize = CGSize(width: frameSize.width * zoomScale, height: frameSize.height * zoomScale)
        let contentOffset = self.scrollView.contentOffset

        let x = contentOffset.x * imageSize.width / contentSize.width
        let y1 = contentSize.height - contentOffset.y - frameSize.height
        let y2 = imageSize.height / contentSize.height
        let y = y1 * y2
        let newOffset = CGPoint(x: x, y: y)

        let newSize = CGSize(width: imageSize.width/zoomScale, height: imageSize.height/zoomScale)
        let newExtent = CGRect(origin: newOffset, size: newSize)

        let cgImage = ciContext.createCGImage(ciImage, from: newExtent)
        let uiImageToSave = UIImage(cgImage: cgImage!, scale: 1.0, orientation: .up)

        UIImageWriteToSavedPhotosAlbum(uiImageToSave,
                                       self, #selector(didFinishSavingImage), nil)
CIFilter したUIImageを UIImageWriteToSavedPhotosAlbum で保存できない。CIFilter を適用する前のUIImageは、保存できる。
CIFilterを適用後、CIImageから UIImage を作成したときにプロパティがNULL になっているため。
UIImageWriteToSavedPhotosAlbum() doesn’t save cropped image
CoreImageでエフェクトした画像がUIActivityViewControllerで画像保存できない
    func savePhoto(image: UIImage)
        let ciImage = image?.ciImage
        let ciContext = CIContext(options: nil)
        let cgImage = ciContext.createCGImage(ciImage!, from: ciImage!.extent)
        let uiImageToSave = UIImage(cgImage: cgImage!, scale: 1.0, orientation: .up)

        UIImageWriteToSavedPhotosAlbum(uiImageToSave,
                                       self, #selector(didFinishSavingImage), nil)
    }

    // エラーの場合アラートを出力
    @objc func didFinishSavingImage(_ image: UIImage, didFinishSavingWithError error: NSError!, contextInfo: UnsafeMutableRawPointer) {
        if error != nil {
            let alertController = UIAlertController(title: "Error", message: "Save Error", preferredStyle: .alert)
            alertController.addAction(UIAlertAction(title: "OK", style: .default, handler: nil))
            self.present(alertController, animated: true, completion: nil)
        }
    }