オリジナル情報源
このページは、次の情報を日本語に翻訳したものです。お役に立てば幸いです。
iOS 13.0以降
Xcode 11.1以降
AVFoundation
概要
iOSカメラアプリを使用すると、前面カメラと背面カメラの両方から写真と動画をキャプチャできます。デバイスによっては、カメラアプリは深度データの静止画キャプチャ、ポートレートエフェクトマット、ライブフォトもサポートしています。
このサンプルコードプロジェクトAVCamは、これらのキャプチャ機能を独自のカメラアプリに実装する方法を示しています。内蔵のフロントおよびリアiPhoneおよびiPadカメラの基本機能を活用します。
注意
AVCamを使用するには、iOS 13以降を実行しているiOSデバイスが必要です。Xcodeはデバイスのカメラにアクセスできないため、このサンプルはシミュレーターでは機能しません。AVCamは、iPhone 7 Plusのポートレートエフェクトマット配信など、現在のデバイスがサポートしていないモードのボタンを非表示にします。
キャプチャセッションの構成
AVCaptureSession は、カメラやマイクなどのキャプチャデバイスからの入力データを受け入れます。入力を受け取った後、そのデータを適切な出力にマーシャリングして処理し、最終的に動画ファイルまたは静止画を作成します。キャプチャセッションの入力と出力を構成した後、キャプチャを開始・停止を師事できるよになります。
private let session = AVCaptureSession()
AVCamはデフォルトで背面カメラを選択し、コンテンツをビデオプレビュービューにストリーミングするようにカメラキャプチャセッションを構成します。PreviewView は、AVCaptureVideoPreviewLayer によってサポートされる UIView のカスタムサブクラスです。AVFoundationクラスには PreviewView はありませんが、サンプルコードはセッション管理を容易にするためにクラスを作成します。
次の図は、セッションが入力デバイスを管理し、出力をキャプチャする方法を示しています。
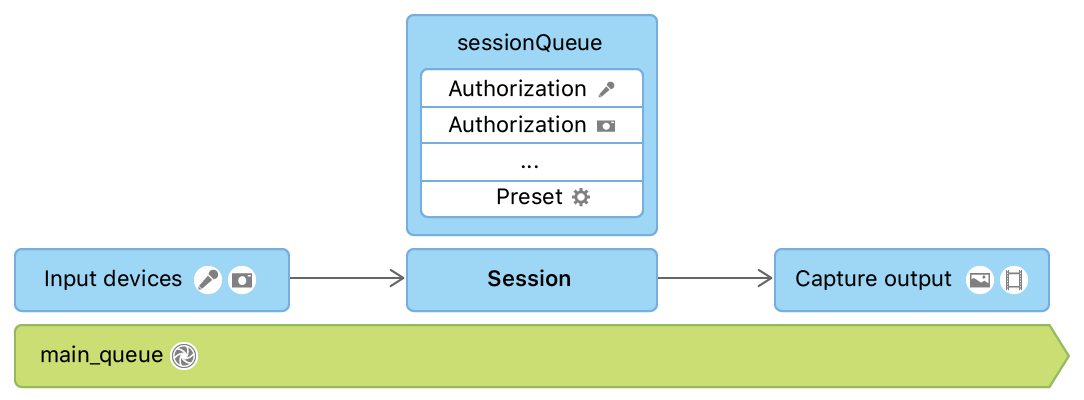
入力と出力を含むすべてのAVCaptureSessionとのインタラクションを専用のシリアルディスパッチキュー(sessionQueue)に委任して、インタラクションがメインキューをブロックしないようにします。セッションの構成は、キューが変更を処理するまで常に他のタスクの実行をブロックするため、セッションのトポロジの変更や、実行中のビデオストリームの中断を含む構成を別のディスパッチキューで実行します。同様に、サンプルコードは、中断されたセッションの再開、キャプチャモードの切り替え、カメラの切り替え、ファイルへのメディアの書き込みなどの他のタスクをセッションキューにディスパッチして、ユーザーの処理がアプリとのユーザーインタラクションをブロックまたは遅延しないようにします。
対照的に、コードは、UIに影響するタスク(プレビュービューの更新など)をメインキューにディスパッチします。これは、CALayerのサブクラスである AVCaptureVideoPreviewLayer がサンプルのプレビュービューのバッキングレイヤーであるためです。メインスレッドで UIViewサブクラスを操作して、それらがタイムリーでインタラクティブな方法で表示されるようにする必要があります。
viewDidLoad で、AVCamはセッションを作成し、それをプレビュービューに割り当てます。
previewView.session = session
イメージキャプチャセッションの構成の詳細については、「キャプチャセッションのセットアップ」を参照してください。
入力デバイスへのアクセスの承認を要求する
セッションを構成すると、入力を受け入れる準備が整います。各AVCaptureDevice (カメラやマイク)は、ユーザーからのアクセス許可が必要です。AVFoundationはAVAuthorizationStatusを使用して認証状態を列挙します。これにより、ユーザーがキャプチャデバイスへのアクセスを制限したか拒否したかをアプリに通知します。
アプリの Info.plist カスタム認証リクエストの準備の詳細については、「iOSでのメディアキャプチャの認証のリクエスト」を参照してください。
背面カメラと前面カメラを切り替える
このchangeCameraメソッドは、ユーザーがUIのボタンをタップしたときにカメラ間の切り替えを処理します。使用可能なデバイスタイプを優先順にリストする検出セッションを使用し、そのアレイの最初のデバイスを受け入れます。たとえば、AVCamで、アプリが実行されているデバイスに videoDeviceDiscoverySession で使用可能な入力デバイスを照会します。ユーザーのデバイスのカメラが壊れている場合、そのデバイスは、配列の中で有効(available)にはなりません。
switch currentPosition {
case .unspecified, .front:
    preferredPosition = .back
    preferredDeviceType = .builtInDualCamera

case .back:
    preferredPosition = .front
    preferredDeviceType = .builtInTrueDepthCamera

@unknown default:
    print("Unknown capture position. Defaulting to back, dual-camera.")
    preferredPosition = .back
    preferredDeviceType = .builtInDualCamera
}
検出セッションで適切な位置にカメラが見つかると、キャプチャセッションから以前の入力が削除され、新しいカメラが入力として追加されます。
// Remove the existing device input first, because AVCaptureSession doesn't support
// simultaneous use of the rear and front cameras.
self.session.removeInput(self.videoDeviceInput)

if self.session.canAddInput(videoDeviceInput) {
    NotificationCenter.default.removeObserver(self, name: .AVCaptureDeviceSubjectAreaDidChange, object: currentVideoDevice)
    NotificationCenter.default.addObserver(self, selector: #selector(self.subjectAreaDidChange), name: .AVCaptureDeviceSubjectAreaDidChange, object: videoDeviceInput.device)

    self.session.addInput(videoDeviceInput)
    self.videoDeviceInput = videoDeviceInput
} else {
    self.session.addInput(self.videoDeviceInput)
}
割り込みとエラーの処理
キャプチャセッション中に、通話、他のアプリからの通知、音楽の再生などの中断が発生する場合があります。監視するAVCaptureSessionWasInterruptedオブザーバーを追加して、これらの中断を処理します
NotificationCenter.default.addObserver(self,
                                       selector: #selector(sessionWasInterrupted),
                                       name: .AVCaptureSessionWasInterrupted,
                                       object: session)
NotificationCenter.default.addObserver(self,
                                       selector: #selector(sessionInterruptionEnded),
                                       name: .AVCaptureSessionInterruptionEnded,
                                       object: session)
AVCamが中断通知を受信すると、中断が終了したときにアクティビティを再開するオプションを使用して、セッションを一時停止または一時停止できます。AVCamは通知を受信するためのsessionWasInterruptedハンドラーを登録し、キャプチャセッションが中断されたときにユーザーに通知します。
if reason == .audioDeviceInUseByAnotherClient || reason == .videoDeviceInUseByAnotherClient {
    showResumeButton = true
} else if reason == .videoDeviceNotAvailableWithMultipleForegroundApps {
    // Fade-in a label to inform the user that the camera is unavailable.
    cameraUnavailableLabel.alpha = 0
    cameraUnavailableLabel.isHidden = false
    UIView.animate(withDuration: 0.25) {
        self.cameraUnavailableLabel.alpha = 1
    }
} else if reason == .videoDeviceNotAvailableDueToSystemPressure {
    print("Session stopped running due to shutdown system pressure level.")
}
カメラビューコントローラーは、エラーが発生したときに通知を受け取るようにAVCaptureSessionRuntimeError を監視します。
NotificationCenter.default.addObserver(self,
                                       selector: #selector(sessionRuntimeError),
                                       name: .AVCaptureSessionRuntimeError,
                                       object: session)
ランタイムエラーが発生したら、キャプチャセッションを再開します。
// If media services were reset, and the last start succeeded, restart the session.
if error.code == .mediaServicesWereReset {
    sessionQueue.async {
        if self.isSessionRunning {
            self.session.startRunning()
            self.isSessionRunning = self.session.isRunning
        } else {
            DispatchQueue.main.async {
                self.resumeButton.isHidden = false
            }
        }
    }
} else {
    resumeButton.isHidden = false
}
キャプチャセッションは、デバイスが過熱などのシステムプレッシャーに耐える場合にも停止することがあります。カメラ自体がキャプチャ品質を低下させたり、フレームをドロップすることはありません。臨界点に達すると、カメラが動作を停止するか、デバイスがシャットダウンします。ユーザーを驚かせないようにするには、フレームレートを手動で下げたり、深度をオフにしたり、AVCaptureDevice.SystemPressureState からのフィードバックに基づいてパフォーマンスを調整したりすることができます。
let pressureLevel = systemPressureState.level
if pressureLevel == .serious || pressureLevel == .critical {
    if self.movieFileOutput == nil || self.movieFileOutput?.isRecording == false {
        do {
            try self.videoDeviceInput.device.lockForConfiguration()
            print("WARNING: Reached elevated system pressure level: \(pressureLevel). Throttling frame rate.")
            self.videoDeviceInput.device.activeVideoMinFrameDuration = CMTime(value: 1, timescale: 20)
            self.videoDeviceInput.device.activeVideoMaxFrameDuration = CMTime(value: 1, timescale: 15)
            self.videoDeviceInput.device.unlockForConfiguration()
        } catch {
            print("Could not lock device for configuration: \(error)")
        }
    }
} else if pressureLevel == .shutdown {
    print("Session stopped running due to shutdown system pressure level.")
}
写真撮影
写真の撮影はセッションキューで行われます。プロセスは、ビデオプレビューレイヤーのビデオの向きに合わせて AVCapturePhotoOutput 接続を更新することから始まります。これにより、カメラはユーザーが画面に表示するものを正確にキャプチャできます。
if let photoOutputConnection = self.photoOutput.connection(with: .video) {
    photoOutputConnection.videoOrientation = videoPreviewLayerOrientation!
}
出力を調整した後、AVCamは AVCapturePhotoSettings の作成に進み、フォーカス、フラッシュ、解像度などのキャプチャパラメーターを構成します。
var photoSettings = AVCapturePhotoSettings()

// Capture HEIF photos when supported. Enable auto-flash and high-resolution photos.
if  self.photoOutput.availablePhotoCodecTypes.contains(.hevc) {
    photoSettings = AVCapturePhotoSettings(format: [AVVideoCodecKey: AVVideoCodecType.hevc])
}

if self.videoDeviceInput.device.isFlashAvailable {
    photoSettings.flashMode = .auto
}

photoSettings.isHighResolutionPhotoEnabled = true
if !photoSettings.__availablePreviewPhotoPixelFormatTypes.isEmpty {
    photoSettings.previewPhotoFormat = [kCVPixelBufferPixelFormatTypeKey as String: photoSettings.__availablePreviewPhotoPixelFormatTypes.first!]
}
// Live Photo capture is not supported in movie mode.
if self.livePhotoMode == .on && self.photoOutput.isLivePhotoCaptureSupported {
    let livePhotoMovieFileName = NSUUID().uuidString
    let livePhotoMovieFilePath = (NSTemporaryDirectory() as NSString).appendingPathComponent((livePhotoMovieFileName as NSString).appendingPathExtension("mov")!)
    photoSettings.livePhotoMovieFileURL = URL(fileURLWithPath: livePhotoMovieFilePath)
}

photoSettings.isDepthDataDeliveryEnabled = (self.depthDataDeliveryMode == .on
    && self.photoOutput.isDepthDataDeliveryEnabled)

photoSettings.isPortraitEffectsMatteDeliveryEnabled = (self.portraitEffectsMatteDeliveryMode == .on
    && self.photoOutput.isPortraitEffectsMatteDeliveryEnabled)

if photoSettings.isDepthDataDeliveryEnabled {
    if !self.photoOutput.availableSemanticSegmentationMatteTypes.isEmpty {
        photoSettings.enabledSemanticSegmentationMatteTypes = self.selectedSemanticSegmentationMatteTypes
    }
}

photoSettings.photoQualityPrioritization = self.photoQualityPrioritizationMode
このサンプルでは、写真キャプチャデリゲートに個別の PhotoCaptureProcessor オブジェクトを使用して、各キャプチャライフサイクルを分離します。キャプチャサイクルのこの明確な分離は、単一のキャプチャサイクルが複数のフレームのキャプチャに関係するLive Photosに必要です。
ユーザーが中央のシャッターボタンを押すたびに、AVCamはcapturePhoto(with:delegate:) を呼び出して、以前に構成された設定で写真をキャプチャします。
self.photoOutput.capturePhoto(with: photoSettings, delegate: photoCaptureProcessor)
このcapturePhotoメソッドは2つのパラメーターを受け入れます。
- 露出、フラッシュ、フォーカス、トーチなど、ユーザーがアプリを通じて構成した設定をカプセル化するAVCapturePhotoSettingsオブジェクト。
AVCapturePhotoCaptureDelegate
プロトコルに準拠するデリゲート。写真のキャプチャ中にシステムが配信する後続のコールバックに応答します。
アプリがcapturePhoto(with:delegate:)を呼び出すと、写真撮影を開始するプロセスが終了します。それ以降、その個々の写真キャプチャの操作はデリゲートコールバックで行われます。
Photo Capture Delegateを通じて結果を追跡
この方法は、写真を撮るcapturePhotoプロセスを開始するだけです。残りのプロセスは、アプリが実装するデリゲートメソッドで行われます。
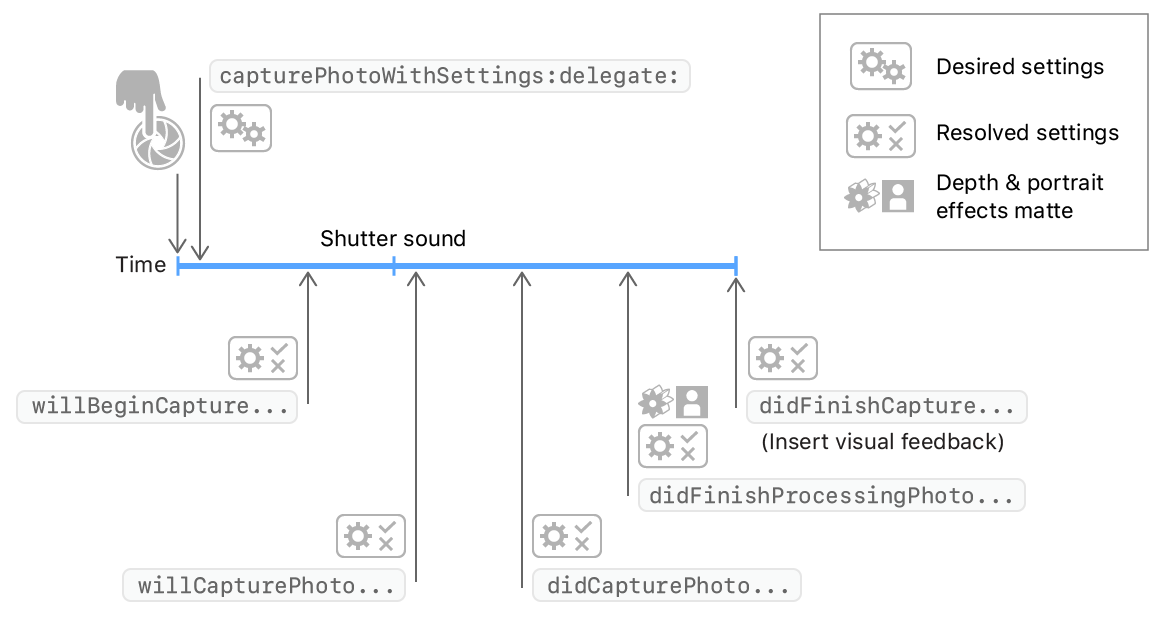
photoOutput(_:willBeginCaptureFor:)
電話をかけるとすぐに最初に到着します。解決された設定は、カメラが次の写真に適用する実際の設定を表します。AVCamは、Live Photosに固有の動作にのみこのメソッドを使用します。AVCamは、livePhotoMovieDimensionsサイズをチェックして、写真がライブ写真かどうかを判断しようとします。写真がライブ写真の場合、AVCamはカウントをインクリメントして進行中のライブ写真を追跡します。
self.sessionQueue.async {
    if capturing {
        self.inProgressLivePhotoCapturesCount += 1
    } else {
        self.inProgressLivePhotoCapturesCount -= 1
    }

    let inProgressLivePhotoCapturesCount = self.inProgressLivePhotoCapturesCount
    DispatchQueue.main.async {
        if inProgressLivePhotoCapturesCount > 0 {
            self.capturingLivePhotoLabel.isHidden = false
        } else if inProgressLivePhotoCapturesCount == 0 {
            self.capturingLivePhotoLabel.isHidden = true
        } else {
            print("Error: In progress Live Photo capture count is less than 0.")
        }
    }
}
photoOutput(_:willCapturePhotoFor:)
システムがシャッター音を鳴らした直後に到着します。AVCamはこの機会を利用して画面を点滅させ、カメラが写真を撮影したことをユーザーに警告します。サンプルコードでは、プレビュービューレイヤーのopacityfromから0toをアニメーション化することにより、このフラッシュを実装してい1ます。
// Flash the screen to signal that AVCam took a photo.
DispatchQueue.main.async {
    self.previewView.videoPreviewLayer.opacity = 0
    UIView.animate(withDuration: 0.25) {
        self.previewView.videoPreviewLayer.opacity = 1
    }
}
photoOutput(_:didFinishProcessingPhoto:error:)
システムが深度データとポートレートエフェクトマットの処理を完了すると到着します。AVCamは、この段階でポートレート効果のマットと深度メタデータをチェックします。
// A portrait effects matte gets generated only if AVFoundation detects a face.
if var portraitEffectsMatte = photo.portraitEffectsMatte {
    if let orientation = photo.metadata[ String(kCGImagePropertyOrientation) ] as? UInt32 {
        portraitEffectsMatte = portraitEffectsMatte.applyingExifOrientation(CGImagePropertyOrientation(rawValue: orientation)!)
    }
    let portraitEffectsMattePixelBuffer = portraitEffectsMatte.mattingImage
    let portraitEffectsMatteImage = CIImage( cvImageBuffer: portraitEffectsMattePixelBuffer, options: [ .auxiliaryPortraitEffectsMatte: true ] )
photoOutput(_:didFinishCaptureFor:error:)
1つの写真のキャプチャの終了を示す最後のコールバックです。AVCamはデリゲートと設定をクリーンアップして、後続の写真キャプチャのために残さないようにします。
self.sessionQueue.async {
    self.inProgressPhotoCaptureDelegates[photoCaptureProcessor.requestedPhotoSettings.uniqueID] = nil
}
このデリゲートメソッドでは、キャプチャした写真のプレビューサムネイルをアニメーション化するなど、他の視覚効果を適用できます。
デリゲートコールバックによる写真の進行状況の追跡の詳細については、「写真キャプチャの進行状況の追跡」を参照してください。
ライブ写真のキャプチャ
ライブフォトのキャプチャを有効にすると、カメラはキャプチャの瞬間を中心に1つの静止画像と短いムービーを撮影します。アプリは、静止写真のキャプチャと同じ方法でライブ写真のキャプチャをトリガーします。つまり、capturePhotoWithSettingsへの1回の呼び出しで、livePhotoMovieFileURLプロパティを通じてライブ写真の短いビデオのURLを渡します。AVCapturePhotoOutputレベルでLive Photosを有効にするか、キャプチャごとにAVCapturePhotoSettingsレベルでLive Photosを構成できます。
Live Photoキャプチャは短いムービーファイルを作成するため、AVCamはムービーファイルを保存する場所をURLとして表現する必要があります。また、Live Photoキャプチャはオーバーラップする可能性があるため、コードは進行中のLive Photoキャプチャの数を追跡して、これらのキャプチャ中にLive Photoラベルが常に表示されるようにする必要があります。前のセクションの photoOutput(_:willBeginCaptureFor:)デリゲートメソッドは、この追跡カウンターを実装します。
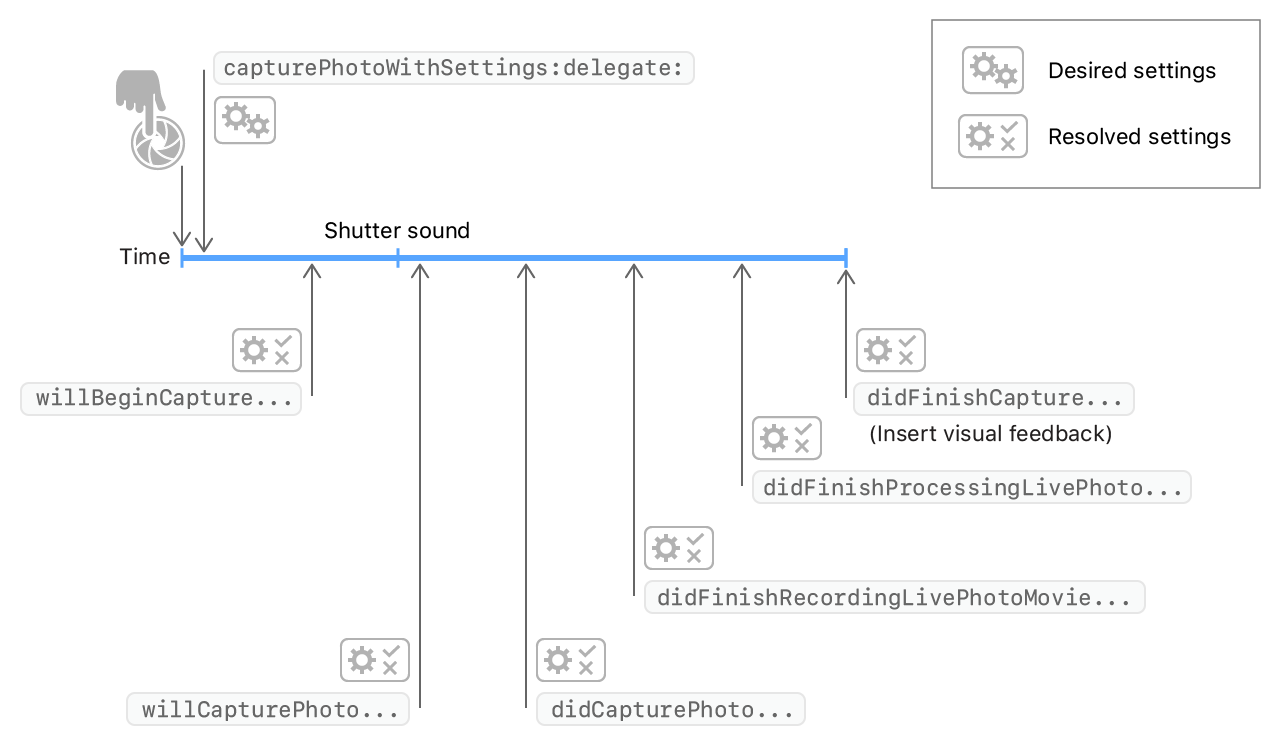
photoOutput(_:didFinishRecordingLivePhotoMovieForEventualFileAt:resolvedSettings:)
ショートムービーの録画が終了すると発生します。AVCamはここでライブバッジを却下します。カメラが短いムービーの記録を終了したため、AVCamはLive Photoハンドラーを実行して、完了カウンターをデクリメントします。
livePhotoCaptureHandler(false)
photoOutput(_:didFinishProcessingLivePhotoToMovieFileAt:duration:photoDisplayTime:resolvedSettings:error:)
最後に起動し、映画が完全にディスクに書き込まれ、使用できる状態になったことを示します。AVCamはこの機会を利用して、キャプチャエラーを表示し、保存されたファイルのURLを最終的な出力場所にリダイレクトします。
if error != nil {
    print("Error processing Live Photo companion movie: \(String(describing: error))")
    return
}
livePhotoCompanionMovieURL = outputFileURL
アプリにライブ写真キャプチャを組み込む方法の詳細については、「静止画とライブ写真をキャプチャする」を参照してください。
深度データとPortrait Effects Matteのキャプチャ
AVCapturePhotoOutput を使用して、AVCamはキャプチャデバイスにクエリを実行し、その構成が深度データとポートレートエフェクトマットを静止画像に提供できるかどうかを確認します。入力デバイスがこれらのモードのいずれかをサポートし、キャプチャ設定でそれらを有効にした場合、カメラは深度ごとのEffects Matteを写真ごとのリクエストに基づいて補助メタデータとして添付します。デバイスが深度データ、portrait effects matte、またはライブ写真の配信をサポートしている場合、アプリにはボタンが表示され、機能を有効または無効にする設定を切り替えるために使用されます。
           if self.photoOutput.isDepthDataDeliverySupported {
               self.photoOutput.isDepthDataDeliveryEnabled = true

               DispatchQueue.main.async {
                   self.depthDataDeliveryButton.isEnabled = true
               }
           }

           if self.photoOutput.isPortraitEffectsMatteDeliverySupported {
               self.photoOutput.isPortraitEffectsMatteDeliveryEnabled = true

               DispatchQueue.main.async {
                   self.portraitEffectsMatteDeliveryButton.isEnabled = true
               }
           }

           if !self.photoOutput.availableSemanticSegmentationMatteTypes.isEmpty {
self.photoOutput.enabledSemanticSegmentationMatteTypes = self.photoOutput.availableSemanticSegmentationMatteTypes
               self.selectedSemanticSegmentationMatteTypes = self.photoOutput.availableSemanticSegmentationMatteTypes

               DispatchQueue.main.async {
                   self.semanticSegmentationMatteDeliveryButton.isEnabled = (self.depthDataDeliveryMode == .on) ? true : false
               }
           }

           DispatchQueue.main.async {
               self.livePhotoModeButton.isHidden = false
               self.depthDataDeliveryButton.isHidden = false
               self.portraitEffectsMatteDeliveryButton.isHidden = false
               self.semanticSegmentationMatteDeliveryButton.isHidden = false
               self.photoQualityPrioritizationSegControl.isHidden = false
               self.photoQualityPrioritizationSegControl.isEnabled = true
           }
カメラは、奥行きとポートレート効果のマットメタデータを補助画像として保存し、Image I / O API を通じて検出およびアドレス指定できます。AVCamは、次のkCGImageAuxiliaryDataTypePortraitEffectsMatte型の補助画像を検索して、このメタデータにアクセスします。
if var portraitEffectsMatte = photo.portraitEffectsMatte {
    if let orientation = photo.metadata[String(kCGImagePropertyOrientation)] as? UInt32 {
        portraitEffectsMatte = portraitEffectsMatte.applyingExifOrientation(CGImagePropertyOrientation(rawValue: orientation)!)
    }
    let portraitEffectsMattePixelBuffer = portraitEffectsMatte.mattingImage
深度データキャプチャの詳細については、深度を使用した写真のキャプチャを参照してください。
セマンティックセグメンテーションMattesのキャプチャ
また、AVCapturePhotoOutputを使用すると、AVCamはセマンティックセグメンテーションマットをキャプチャして、人の髪、皮膚、歯を個別のマットイメージにセグメント化できます。メインの写真とともにこれらの補助画像をキャプチャできるため、人物の髪の色を変更したり、笑顔を明るくしたりするなど、写真の効果を簡単に適用できます。
enabledSemanticSegmentationMatteTypes プロパティにお好みの値(hairskinteeth)を写真出力に設定することにより、これらの補助画像の撮影が可能になります。サポートされているすべてのタイプをキャプチャするには、このプロパティを写真出力のプロパティと一致するように設定します。
// Capture all available semantic segmentation matte types.
photoOutput.enabledSemanticSegmentationMatteTypes =
    photoOutput.availableSemanticSegmentationMatteTypes
写真出力で写真のキャプチャが終了したら、写真のsemanticSegmentationMatte(for:)メソッドをクエリして、関連するセグメンテーションマットイメージを取得します。このメソッドは、マット画像と、画像の処理時に使用できる追加のメタデータを含むAVSemanticSegmentationMatteを返します。サンプルアプリは、セマンティックセグメンテーションマットイメージのデータを配列に追加して、ユーザーのフォトライブラリに書き込むことができるようにします。
// Find the semantic segmentation matte image for the specified type.
guard var segmentationMatte = photo.semanticSegmentationMatte(for: ssmType) else { return }

// Retrieve the photo orientation and apply it to the matte image.
if let orientation = photo.metadata[String(kCGImagePropertyOrientation)] as? UInt32,
    let exifOrientation = CGImagePropertyOrientation(rawValue: orientation) {
    // Apply the Exif orientation to the matte image.
    segmentationMatte = segmentationMatte.applyingExifOrientation(exifOrientation)
}

var imageOption: CIImageOption!

// Switch on the AVSemanticSegmentationMatteType value.
switch ssmType {
case .hair:
    imageOption = .auxiliarySemanticSegmentationHairMatte
case .skin:
    imageOption = .auxiliarySemanticSegmentationSkinMatte
case .teeth:
    imageOption = .auxiliarySemanticSegmentationTeethMatte
default:
    print("This semantic segmentation type is not supported!")
    return
}

guard let perceptualColorSpace = CGColorSpace(name: CGColorSpace.sRGB) else { return }

// Create a new CIImage from the matte's underlying CVPixelBuffer.
let ciImage = CIImage( cvImageBuffer: segmentationMatte.mattingImage,
                       options: [imageOption: true,
                                 .colorSpace: perceptualColorSpace])

// Get the HEIF representation of this image.
guard let imageData = context.heifRepresentation(of: ciImage,
                                                 format: .RGBA8,
                                                 colorSpace: perceptualColorSpace,
                                                 options: [.depthImage: ciImage]) else { return }

// Add the image data to the SSM data array for writing to the photo library.
semanticSegmentationMatteDataArray.append(imageData)
ユーザーの写真ライブラリに写真を保存する
画像またはムービーをユーザーのフォトライブラリに保存する前に、まずそのライブラリへのアクセスをリクエストする必要があります。書き込み承認ミラーを要求するプロセスは、デバイス承認をキャプチャします。Info.plist で指定したテキストを含むアラートを表示します。
AVCamは、fileOutput(_:didFinishRecordingTo:from:error:)コールバックメソッドで認証をチェックします。これは、AVCaptureOutput が出力として保存するメディアデータを提供する場所です。
PHPhotoLibrary.requestAuthorization { status in
ユーザーの写真ライブラリへのアクセスのリクエストの詳細については、写真へのアクセスを承認するリクエスト を参照してください。
動画ファイルを記録する
AVCamは、.video修飾子を使用して入力デバイスをクエリおよび追加することにより、ビデオキャプチャをサポートします。アプリのデフォルトは背面デュアルカメラですが、デバイスにデュアルカメラがない場合、アプリのデフォルトは広角カメラになります。
if let dualCameraDevice = AVCaptureDevice.default(.builtInDualCamera, for: .video, position: .back) {
    defaultVideoDevice = dualCameraDevice
} else if let backCameraDevice = AVCaptureDevice.default(.builtInWideAngleCamera, for: .video, position: .back) {
    // If a rear dual camera is not available, default to the rear wide angle camera.
    defaultVideoDevice = backCameraDevice
} else if let frontCameraDevice = AVCaptureDevice.default(.builtInWideAngleCamera, for: .video, position: .front) {
    // If the rear wide angle camera isn't available, default to the front wide angle camera.
    defaultVideoDevice = frontCameraDevice
}
スチール写真のようにシステムに設定を渡す代わりに、Live Photosのように出力URLを渡します。デリゲートコールバックは同じURLを提供するので、アプリはそれを中間変数に格納する必要はありません。
ユーザーが[記録]をタップしてキャプチャを開始すると、AVCamがstartRecording(to:recordingDelegate:)を呼び出します。
movieFileOutput.startRecording(to: URL(fileURLWithPath: outputFilePath), recordingDelegate: self)
capturePhoto が静止キャプチャのためにデリゲートコールバックをトリガーしたのと同様に、startRecording はムービーの記録のための一連のデリゲートコールバックをトリガーします。
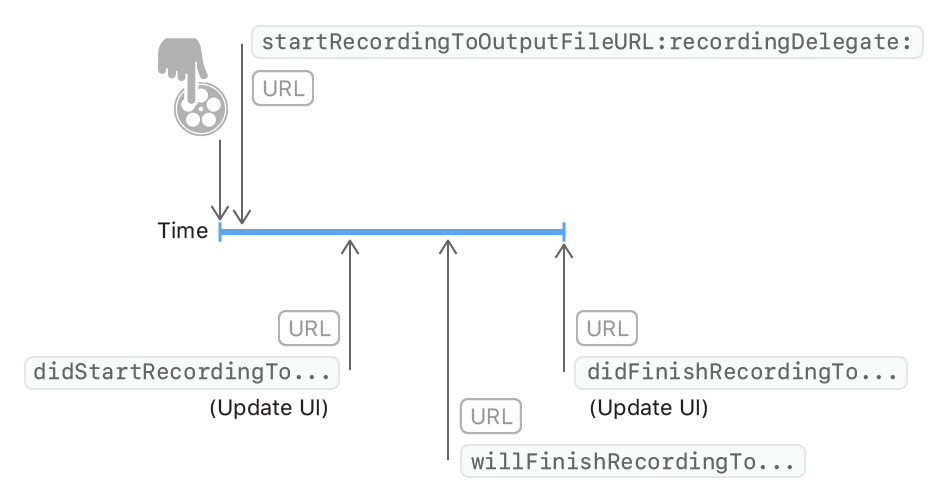
デリゲートコールバックチェーンを通じて、映画の録画の進行状況を追跡します。AVCapturePhotoCaptureDelegate を実装する代わりに、AVCaptureFileOutputRecordingDelegate を実装します。ムービーを記録するデリゲートコールバックはキャプチャセッションとの相互作用を必要とするため、AVCamは個別のデリゲートオブジェクトを作成する代わりにデリゲートを作成します。
fileOutput(_:didStartRecordingTo:from:)
ファイル出力がファイルへのデータの書き込みを開始すると発生します。AVCamはこの機会を利用して、[記録]ボタンを[停止]ボタンに変更します。
DispatchQueue.main.async {
    self.recordButton.isEnabled = true
    self.recordButton.setImage(#imageLiteral(resourceName: "CaptureStop"), for: [])
}
fileOutput(_:didFinishRecordingTo:from:error:)
最後に起動され、映画が完全にディスクに書き込まれ、使用できる状態になったことを示します。AVCamはこの機会に、一時的に保存されたムービーを、指定されたURLからユーザーの写真ライブラリまたはアプリのドキュメントフォルダーに移動します。
PHPhotoLibrary.shared().performChanges({
    let options = PHAssetResourceCreationOptions()
    options.shouldMoveFile = true
    let creationRequest = PHAssetCreationRequest.forAsset()
    creationRequest.addResource(with: .video, fileURL: outputFileURL, options: options)
}, completionHandler: { success, error in
    if !success {
        print("AVCam couldn't save the movie to your photo library: \(String(describing: error))")
    }
    cleanup()
}
)
AVCamがバックグラウンドに入った場合(ユーザーが電話の着信を受け入れる場合など)は、アプリはユーザーに録音を続行する許可を求める必要があります。AVCamは、バックグラウンドタスクを通じてこの保存を実行するためにシステムに時間を要求します。このバックグラウンドタスクにより、AVCamがバックグラウンドに戻った場合でも、ファイルをフォトライブラリに書き込むのに十分な時間が確保されます。バックグラウンド実行を完了するために、AVCamは記録されたファイルを保存した 後にfileOutput(_:didFinishRecordingTo:from:error:) の endBackgroundTask(_:)を呼び出します。
self.backgroundRecordingID = UIApplication.shared.beginBackgroundTask(expirationHandler: nil)
動画の撮影中に写真を撮る
iOSカメラアプリと同様に、AVCamは写真を撮りながらムービーをキャプチャできます。AVCamはそのような写真をビデオと同じ解像度でキャプチャします。
let movieFileOutput = AVCaptureMovieFileOutput()

if self.session.canAddOutput(movieFileOutput) {
    self.session.beginConfiguration()
    self.session.addOutput(movieFileOutput)
    self.session.sessionPreset = .high
    if let connection = movieFileOutput.connection(with: .video) {
        if connection.isVideoStabilizationSupported {
            connection.preferredVideoStabilizationMode = .auto
        }
    }
    self.session.commitConfiguration()

    DispatchQueue.main.async {
        captureModeControl.isEnabled = true
    }

    self.movieFileOutput = movieFileOutput

    DispatchQueue.main.async {
        self.recordButton.isEnabled = true

        /*
         For photo captures during movie recording, Speed quality photo processing is prioritized
         to avoid frame drops during recording.
         */
        self.photoQualityPrioritizationSegControl.selectedSegmentIndex = 0
        self.photoQualityPrioritizationSegControl.sendActions(for: UIControl.Event.valueChanged)
    }
}
